An orchid’s bright, shiny leaves are just as important to the orchid’s beauty as the flowers. Firm, green leaves are a sign of a healthy orchid. An unhealthy orchid’s leaves signal that there is a problem.
Overwatered orchid leaves look “off.” If you notice drooping leaves or yellow leaves, you might be overwatering your orchid.
Your orchid will have physical symptoms if you are overwatering it. Keep reading to find out how to tell if you are overwatering your orchid and what to do to revive it.
What Does an Overwatered Orchid Look Like?
Are you worried that you might be overwatering your orchid but aren’t sure? Orchids give clear signs when something is wrong, including when they are being overwatered. Here’s what to look for.
Overwatered Leaves
Healthy orchid leaves will be green, shiny, and firm. Overwatered orchids will have leaves that look limp or sometimes leathery depending on the species. The existing leaves may begin turning yellow, and new leaves may look pleated. Usually a change in the leaves is the most visible warning sign that orchids give.
Overwatered Orchid Roots
Orchid roots also have changes when orchids are overwatered. You’ll need to check the roots in the container, though; don’t rely on the appearance of aerial roots because orchid roots above the surface tend to look dry even when you are watering correctly.
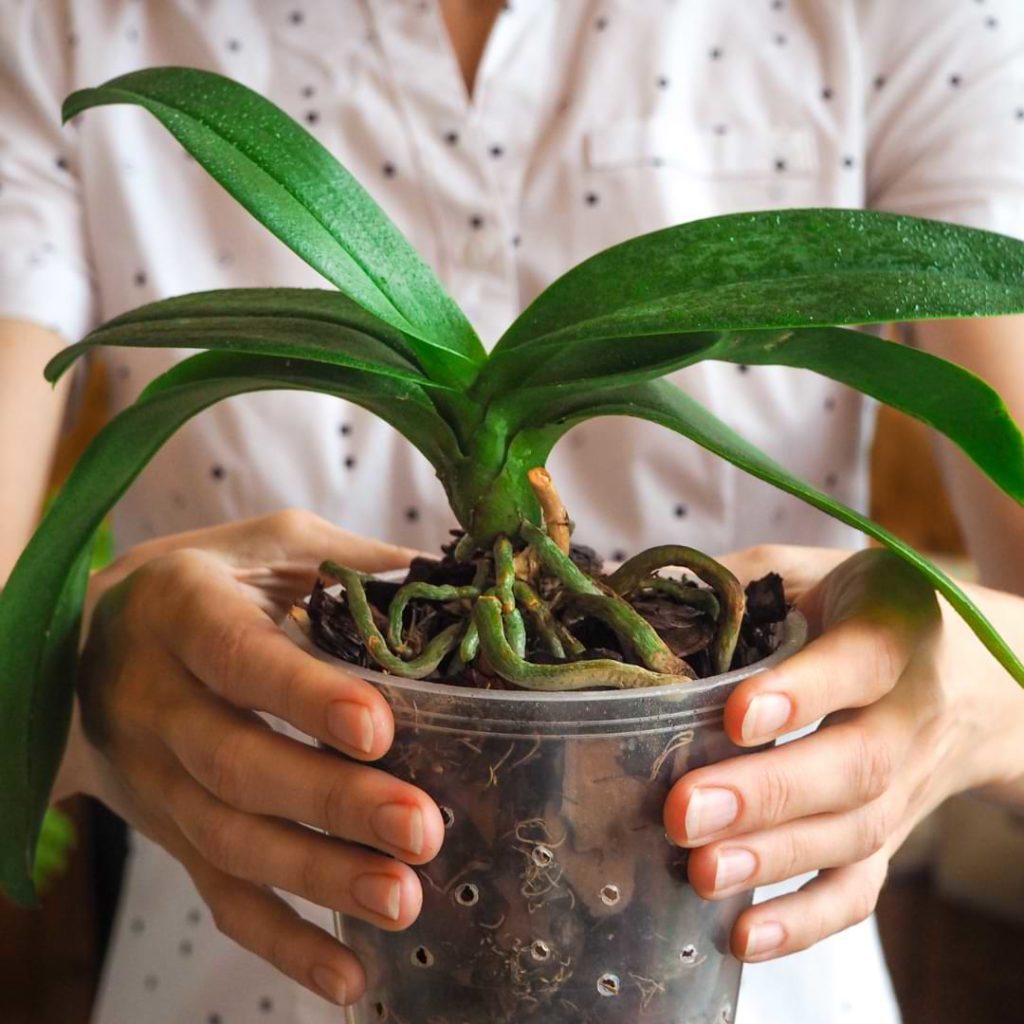
Instead, carefully slide the orchid out of its container to check the buried roots. Healthy orchid roots are firm. Depending on the orchid type, the roots should either be white or silvery-green. If you have recently watered, the roots should be bright green.
If you see mushy, brown roots instead, then your orchid roots are not healthy, and this is a sign of overwatering. Mushy, brown roots have root rot, and they cannot absorb enough nutrients or oxygen for the orchid.
Stem
You’ll likely notice problems with the leaves and the roots before you see changes in an overwatered orchid’s stem. An orchid’s stem will turn yellow if your orchid is dying from overwatering. It’s difficult to save an orchid that has reached this stage.
How to Fix an Overwatered Orchid
If enough of the roots are still healthy, it’s possible to save an overwatered orchid. You’ll need to take different steps depending on the severity of the damage.
Allow Roots to Dry Out and Check for Signs of Root Rot
The first step to reviving an overwatered orchid is to allow the roots to dry out. If you haven’t overwatered too much, this plus adjusting the watering schedule might be the only steps you need to take.
Allow a few days for things to dry out. Then carefully remove the orchid from its container and check for signs of root rot: mushy brown or black roots. Use sterilized scissors to remove damaged roots.
Adjust Watering Schedule
If you saw minimal root rot while checking the roots, you might only need to adjust the watering schedule. Allow more time between waterings. The general rule is to only water orchids once every 7 to 10 days.
Of course, your watering schedule should take into account the type of orchid you have and the environment in your home.
Repot an Orchid & Change Potting Medium
If your orchid’s roots are moderately to severely affected by root rot, you should repot the orchid and change the potting medium. Growing medium breaks down and retains more water over time, so repotting and changing the potting medium will give your overwatered orchid the best chance to survive.
Here’s what to do:
- Gently remove the orchid from its container. Remove any potting medium from the roots, and discard the potting medium in the container. Trim off any roots that have rotted with a sterilized pair of scissors.
- Wash the container with soap and water. Ensure the drainage holes are not blocked by any debris. Clean the drainage tray as well if you are using one.
- Fill the container with good-quality, fresh orchid potting mix. Water the medium just enough to make it slightly damp as your orchid is still recovering from overwatering.
- Carefully place the orchid back in the pot, spreading the roots out. Cover the roots with additional potting medium, but do not pack down the soil—the roots need to breathe!
- Place the orchid back in its preferred spot. Do not water it again until at least the top inch of the potting medium has dried out.
Once you have repotted your orchid and changed the potting medium, continue to monitor it before watering. Your orchid may not bounce back quickly, but don’t start overwatering again! For some reason, it’s tempting to overwater an unhealthy orchid, even when you know that overwatering caused the problem in the first place.
Check Orchid Pot for Adequate Drainage Holes
To help prevent overwatering in the future, make sure your orchid pot has adequate drainage holes. Sometimes the problem isn’t that you are watering too often, it’s that excess water doesn’t have a good way to escape.
A pot with no drainages holes will not work for orchids; in fact, it must have multiple drainage holes. Smaller containers should have at least four drainage holes. The larger the container, the more drainage holes needed.
Do not place objects in the pot that will block the drainage holes. When repotting, be sure to remove any debris wedged into the holes.
Your orchid may be sold in a pretty pot without a drainage hole, but the orchid won’t flourish for long that way. There may be a plastic pot with multiple drainage holes inside the pretty pot. If that’s the case, then remove the plastic pot from the other container when you water. Allow time for the excess water to drain before returning your orchid and the plastic pot to the cachepot (the fancy container without drainage holes).
How to Prevent Overwatered Orchid Leaves
Overwatering is the most common culprit behind dying orchids. Even though orchids naturally grow in tropical environments, they do not need as much water as you might expect.
Orchids signal that they are being overwatered, but it’s easy to mistake these signals for underwatering instead. Drooping or wrinkly leaves are actually a sign that you are overwatering your orchid.
We’ve already talked about what to do to save an already overwatered orchid. Let’s talk about how to prevent overwatering your orchid in the first place.

How to Tell if Your Orchid Needs Watering
Incorrect watering causes many problems for orchids. You don’t want to overwater or underwater, so how do you know when your orchid needs more water?
There are two ways that you can tell it is time to water your orchid: you can check the growing medium or the roots.
Orchids generally need to be watered just before their growing medium dries out completely. There are some orchids that prefer their growing medium to be completely dry before watering, so check what your orchid species needs to be sure. When you think it’s time to water, stick your finger (or a skewer) into the growing mix. If the soil feels wet, don’t water yet.
You can also check the roots to see if the orchid needs to be watered. Dry orchid roots look a bit gray; so if your orchid roots look gray, you’ve waited too long to water. On the other hand, orchid roots that have just been watered are bright green. If your orchid roots still look bright green, then it’s definitely too soon to water. Checking the roots doesn’t tell you exactly when to water, but it can prevent you from severely overwatering or underwatering your orchid.

How Often Should I Water My Orchid?
On average, orchids should be watered once every 7 to 10 days. The exact timing depends on the type of orchid, the environment, and the season. You’ll likely need to water more often in the summer than in the winter.
Keep in mind that a larger container will dry out more quickly than a smaller container. The type of growing medium also plays a role in how often to water your orchid. For example, sphagnum moss dries out more quickly than bark.
Over time, you’ll figure out just how often your orchid requires watering. Until then, use the growing medium to help you know whether or not it’s time to water. The growing medium should be dry or nearly dry before you water your orchid. If there’s a lot of moisture still in the growing medium, it’s too soon to water again.
Most orchids won’t suffer if they go an extra day or two without water. If you follow proper methods for watering your orchid, they will get the water they need even if they have to wait slightly longer. Of course, this doesn’t mean that you can neglect watering your orchid for weeks and expect it to be okay!
How to Water an Orchid
Lots of plant owners obsess over exactly how to water an orchid. It’s not a complicated process, though. You just need to make sure that you give the growing medium a chance to soak up enough water. There are two popular methods that growers use with orchids.
- Run water over your orchid. The easiest way to water an orchid is to water it under a faucet. Turn the faucet on with lukewarm water and allow the water to soak the growing medium for 15-30 seconds. Let the container stay in the sink for at least 30 minutes until water stops dripping from the bottom.
The water helps wash the dust from the leaves and provides extra moisture to aerial roots. Only use this method to water in the morning, though. You don’t want water to remain on the leaves or crown overnight. If water on the leaves or crown doesn’t dry in a few hours, use a fan.
This mimics how an orchid gets water in the natural environment, so it’s a great watering method.
- Soak your orchid in water. This method is also simple, and helps ensure your orchid gets enough water. Fill a bowl or tray with at least an inch of water. Then place your orchid’s container in the bowl. Allow the growing medium to soak up water for 15-30 minutes.
Once the orchid is done soaking, remove it from the water. Allow the plant to drain for 30 minutes before returning it to its spot.
This method helps to ensure that the growing medium can fully absorb water. You can soak healthy plants, but it’s also good for plants that have been underwatered and need help recovering. I personally like this method because I find that I can water plants a little less frequently.
No matter which way you decide to water your orchid, be sure to use lukewarm water and water in the morning.Watering is the biggest factor in an orchid’s health, so if you are spacing out your waterings correctly and using one of these two methods, your orchid is likely going to thrive.
Join Our Orchid Care Facebook Community
In our Facebook group of orchid lovers, we’re dedicated to creating a rich and engaging environment where plant lovers can come together and share tips, tricks, and experiences.
If you’re an orchid lover, come join our Facebook community! We can’t wait to celebrate your successes and help you troubleshoot your care routine.
For continued success, you can explore our other articles or visit our online shop for plant care products that are sure to keep your plants boasting rich green leaves and big, bountiful blooms year-round.


