Discover the five most common signs your orchid is suffering from root damage, and learn how to fix them right away.
Since orchids use their unique root systems to absorb the nutrients that support lush leaves and big, bountiful blooms, understanding your orchid’s root system is the key to keeping your plant happy and healthy.
Most orchid growers run into trouble when they mistake their orchids for houseplants that have terrestrial roots and can withstand heavy watering and dry climates. It’s important to note that orchids are epiphytic plants, meaning they have roots that don’t burrow into ground soil and instead thrive off of the rich nutrients available in the air.
Once you’re able to dial in your care routine to suit your orchid’s unique root system, your plant is sure to boast thick, lush leaves and stunning blooms year-round.
Let’s take a look at the five most common signs that your orchid is suffering from root issues, and learn a few simple remedies to keep your orchid’s root system healthy so you’re set up for orchid-growing success.
Sign #1: Your orchid’s roots appear mushy.
Mushy roots are a sure sign your orchid is suffering from root damage brought on by overwatering. When you notice mushy roots, it’s time to pause your watering routine, trim off the mushy root section, and repot your plant in a well-draining orchid potting mix to encourage new, healthy growth.
Professional Tip: The right orchid pot can go a long way to prevent root rot and mushy roots. Always opt for a pot that has plenty of drainage and ventilation holes to allow excess water to escape and fresh air to permeate the growing mix. For more tips on how to choose the perfect orchid pot, click here.

Sign #2: Your orchid has brittle or withered roots.
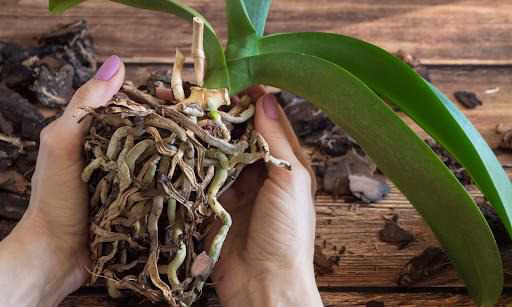
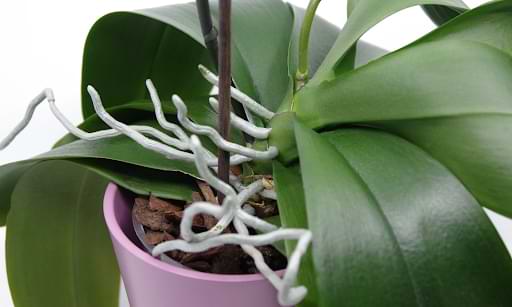
While the majority of your orchid’s roots remain hidden beneath potting mix, it’s natural for orchid roots to grow over the lip of the pot too. This provides a great opportunity to inspect your orchid’s roots to gauge if they’re healthy. Upon inspection, your orchid’s roots should look plump and vibrant, not brittle and withered.
If your orchid’s roots show signs of damage, apply a Root Supplement to give them a boost of nutrients that’ll encourage root system repair.
Professional Tip: One of the easiest and most effective ways to ensure your orchid’s roots stay healthy is to create good drainage for your plant. To learn how to create the perfect orchid drainage in just 3 steps, click here.
Sign #3: Your orchid’s buds drop unexpectedly.
It’s natural for orchids to drop blooms at the end of the blooming season, but if your orchid unexpectedly drops its new buds before they open, your plant’s root system may be suffocating. As soon as you notice new buds wilting, go ahead and repot your orchid in proper orchid potting mix to allow plenty of air to reach your orchid’s roots.
Professional Tip: Using the right potting mix is a tremendously important (and often overlooked) aspect of orchid care. To learn what makes the best orchid potting mix, and to discover our go-to brand, click here.

Sign #4: Your orchid’s leaves are soft or yellowing.
For orchids, listless, soft, or yellowing leaves are most often signs of overwatering or root damage. The simplest fix is to pause your watering routine and let your plant dry out. Though you still have time to reverse the damage, overwatering can easily lead to root rot, so it’s important to pull back on watering right away.
Professional Tip: Wilting leaves can also be caused by a lack of nutrients. Nourish your plant with Premium Orchid Food to ensure your plant is healthy with lush, green foliage and big, bountiful blooms.
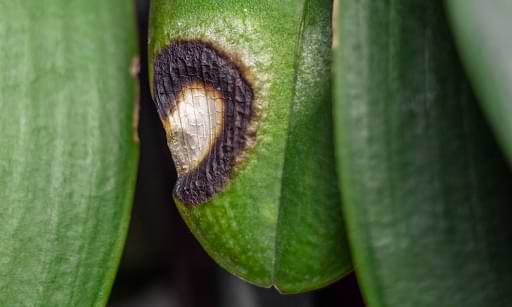
Sign #5: Your orchid’s leaves have water-soaked spots.
Unfortunately, orchids with water-soaked spots or yellow halos on their leaves are usually in dire condition. Erwinia is a plant infection that can rapidly rot your plant’s leaves and inner systems, including its delicate roots. In most cases, an orchid infected with Erwinia is beyond saving in just 2-3 days.
Professional Tip: If your orchid shows signs of Erwinia on its outer leaves, use a sterile pair of garden shears to cut the infected section about 2 inches from the rot damage. Then apply a fungicide to safely kill the infection before it spreads.

How to Treat Your Orchid’s Root Issues
If you notice any of the 5 common signs of root damage, or you suspect your orchid may be suffering from root issues, it’s best to take action immediately.
These simple steps can remedy your orchid’s root issues and set your plant back on track to be happy, healthy, and thriving:
- Step 1: Remove your orchid from its pot. Using a sterile utensil, loosen the ball of roots and gently lift your plant from its current pot.
- Step 2: Inspect your orchid’s roots. Look out for discolored or mushy sections and trim them away with a pair of sharp shears.
- Step 3: Repot your orchid. Choose a pot that has plenty of drainage holes and allows air to easily reach your orchid’s roots.
- Step 4: Nourish your plant with Premium Orchid Food. Ensure your plant has adequate nutrients to support a hearty root system, lush foliage, and big, bountiful blooms by using a trusted orchid fertilizer.
For additional tips on orchid care, join our Facebook community, where orchid lovers from around the world come together to share their experiences, troubleshoot problems, and celebrate their orchid-growing wins.


